The Patchwright Studio
Goal: Know where every control lives so you never hunt for settings, AI keys, or the host path.
Time: ~15 minutes
You can also read this chapter at patchwright.live/docs/the-studio.
Studio layout
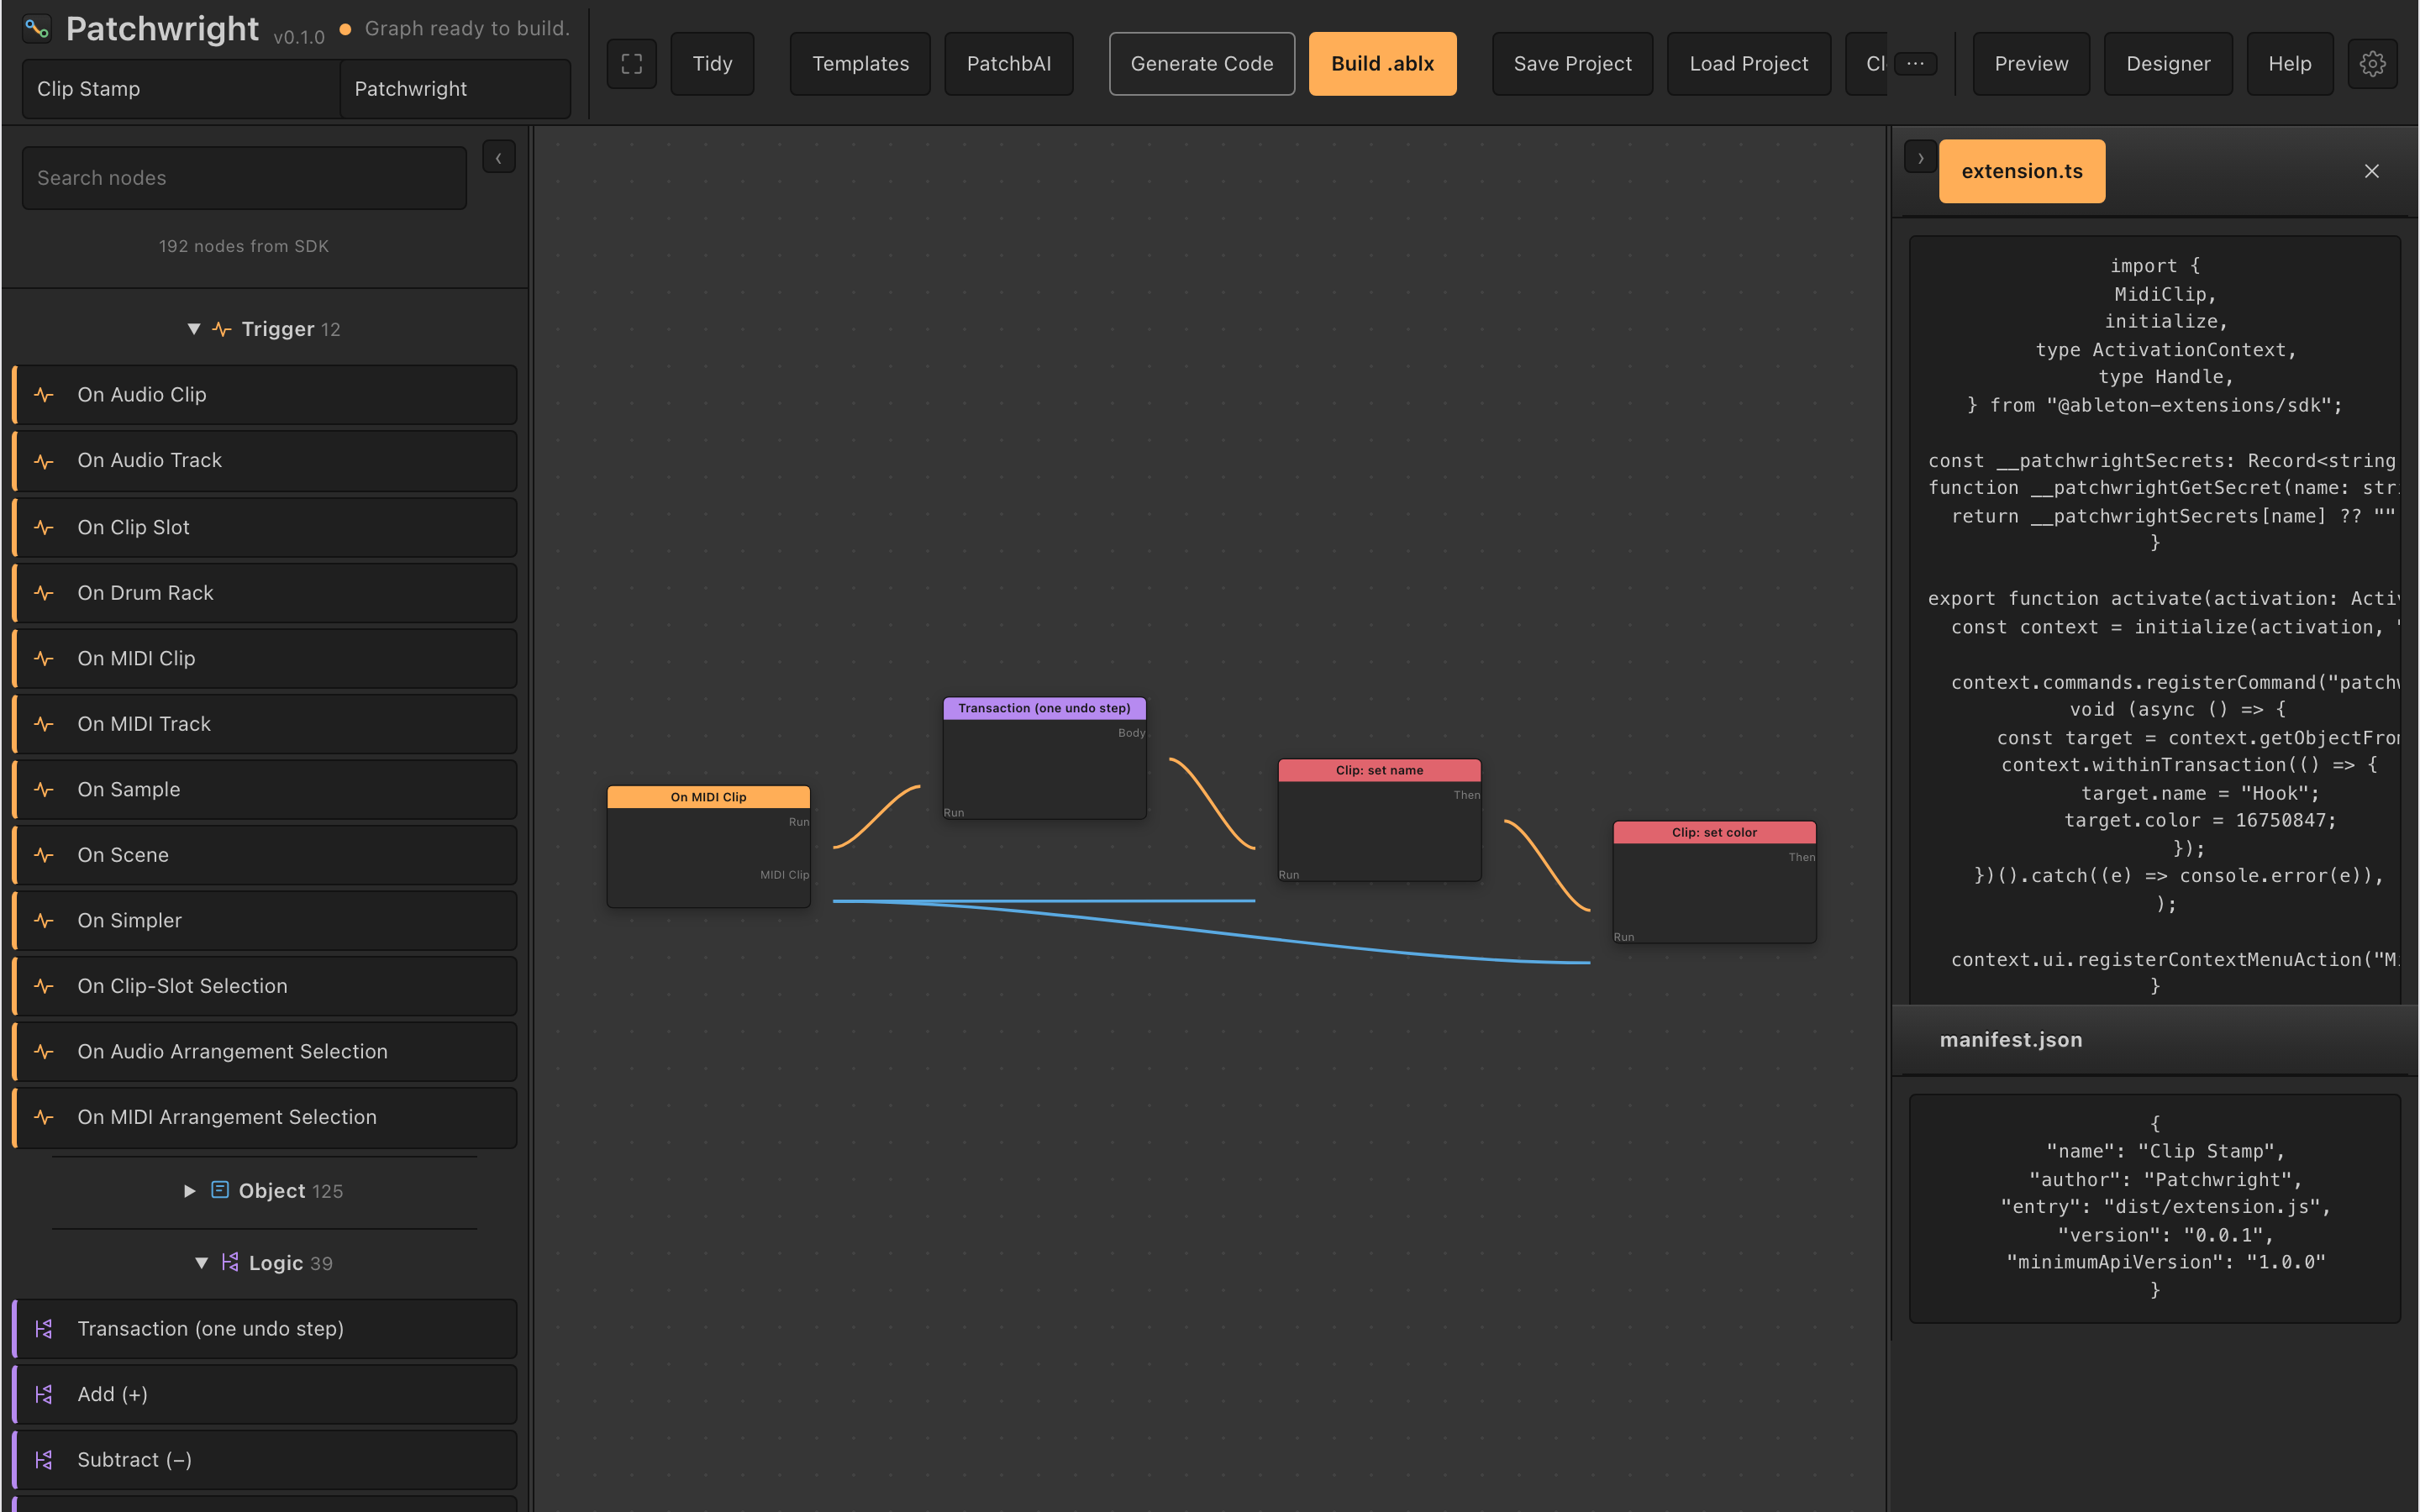 Toolbar, palette (left), canvas (center), and dock panels (right).
Toolbar
The toolbar runs across the top. Left to right, the items you use most:
| Control | What it does |
|---|---|
| Extension name | The name Live shows in the Extensions menu (e.g. Clip Stamp) |
| Author | Your name or studio name; stored in the extension metadata |
| Build status | Shows whether the last build succeeded, failed, or is waiting |
| Fit | Zoom the canvas so all nodes are visible |
| Tidy | Auto-arrange nodes for readability |
| Templates | Load starter graphs (rename clip, transpose, chord arp, …) |
| Build & Run | Compile, connect to Live, and install (desktop) |
Build .ablx |
Export an installable package without running |
| Generate Code | Toggle the read-only code preview in the dock |
| Designer | Toggle the Dialog Designer overlay (not in the dock) |
| Host… | Toggle Extension Host settings in the dock (desktop only) |
| PatchAI | Toggle the AI Assistant panel in the dock |
| Overflow (⋯) | Extra actions when the window is narrow |
Important: Extension name and Author are not just labels inside Patchwright. They appear in Live when you pick your command. Set them before you Build & Run.
Node palette (left)
The palette lists every node you can add, grouped into five top-level sections:
- Trigger — where your command appears in Live
- Object — Live SDK classes (Song, MidiClip, Track, Device, …) and context sources
- Logic — conditions, data transforms, and HTTP fetch
- Music — pitch, timing, and clip-note helpers
- UI — dialog and display nodes
Note: Categories you see in search results (e.g. Context, Notes, Web, Files) are catalog sub-labels that roll up into the groups above. There are no separate "Flow", "branches", or "loops" sections; the undo-boundary node is called transaction and lives in the Trigger group.
Use search when the list is long. Press [ to show or hide the palette.
Canvas (center)
The canvas is your program:
- Pan — drag empty space (behavior depends on Settings → left-drag mode)
- Zoom — scroll wheel or trackpad pinch
- Select — click a node; Shift-click or marquee for multiple
- Move — drag selected nodes
- Wire — drag from an output port to a compatible input
- Delete — select nodes, then Delete / Backspace, or canvas menu → Delete node
Right-click the canvas for context actions including Tidy and delete.
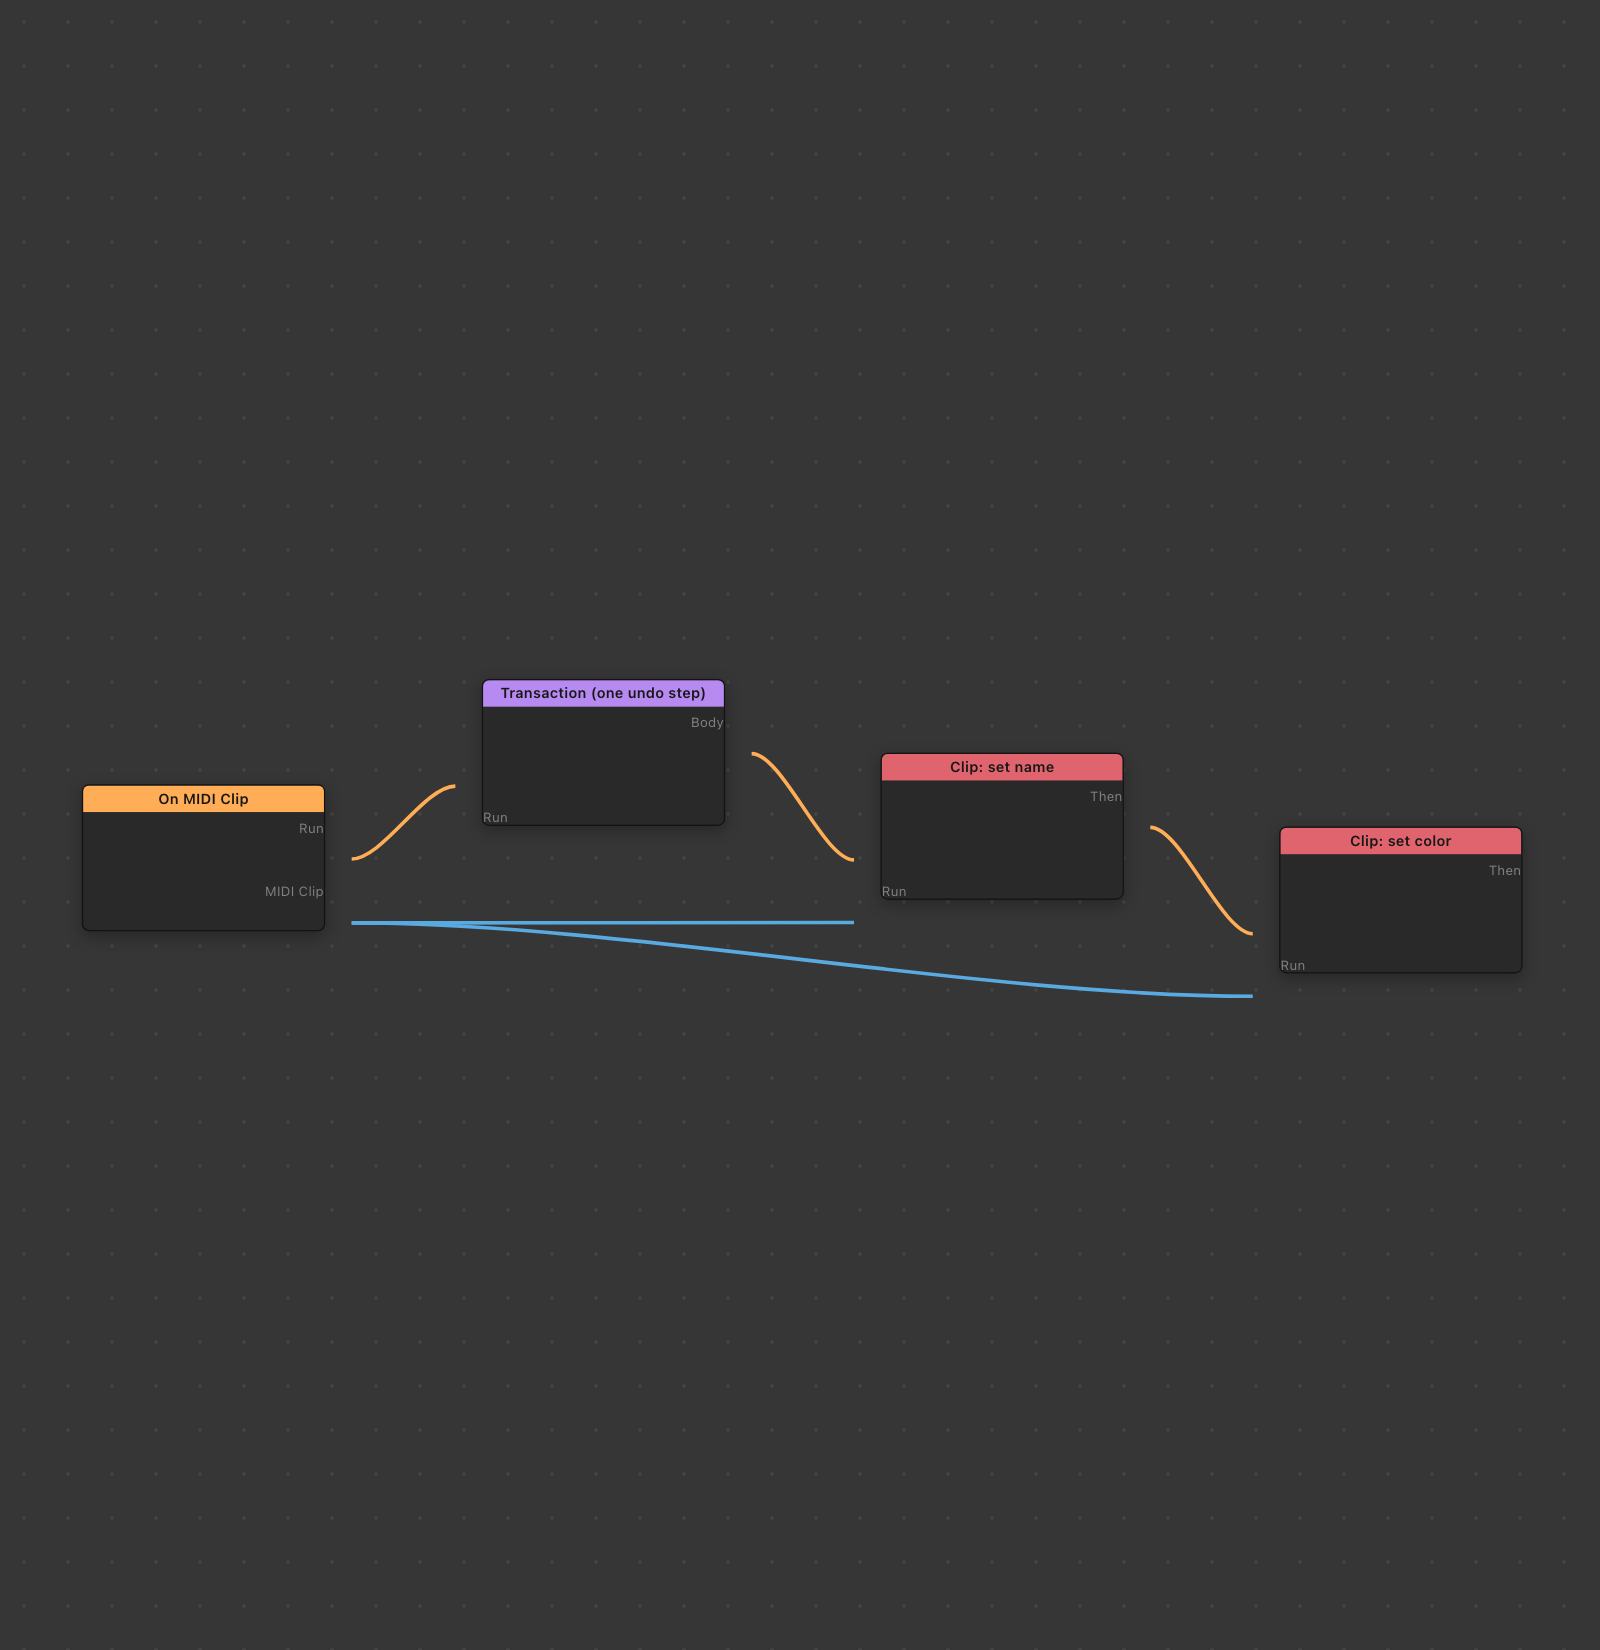 Example: Clip Stamp template — Run flow (orange) and data wires (blue) from the trigger’s target to setters.
Dock (right)
The dock holds panels you open from the toolbar:
| Panel | Open with | Purpose |
|---|---|---|
| Generate Code | Toolbar Generate Code | Read-only preview of what Patchwright will build |
| PatchAI / AI Assistant | Toolbar PatchAI | Describe graphs, fix errors, connect AI providers |
| Extension Host | Toolbar Host… | Pick the Live Extension Host path (desktop only) |
Press ] to show or hide the dock. Panels can detach into separate windows and reattach from the panel header.
Note: Dialog Designer is not a dock panel. Click Designer on the toolbar to open it as an overlay on the canvas.
Settings (gear or Cmd+,)
Settings cover canvas feel and HTTP secrets — not PatchAI keys and not the Extension Host.
| Section | What you change |
|---|---|
| Mouse & Keyboard | Left-drag: marquee select vs pan; input device mode; shortcut reference |
| Music | Base MIDI pitch (default 60) added to Live pitch class when building clip notes |
| Usage telemetry | Opt-in anonymized counts/durations (beta builds only; never prompts/graphs/keys) |
| Learning | Replay the interactive tutorial or open the template gallery again |
| API Secrets | Named keys for HTTP Fetch nodes (Authorization headers) |
On the canvas, Run wires are orange and dashed; data wires use family colors (object blue, number teal, text gold, music purple). Hover a wire to see source, type, and target port. A collapsible Wire types legend sits at the bottom-left of the canvas.
Settings open as a modal or docked panel; Patchwright remembers your choice.
Tip: To set up PatchAI, use the AI Assistant panel (toolbar PatchAI), not Settings.
Tip: To set up Live connection, use Host… on the toolbar, not Settings.
Where do I…?
| I want to… | Go to… |
|---|---|
| Rename my extension in Live’s menu | Toolbar → Extension name |
| Set my author name | Toolbar → Author |
| Connect Patchwright to Live | Toolbar → Host… → Extension Host panel |
| Set up Claude or local AI | Toolbar → PatchAI → AI Assistant |
| Change canvas drag / zoom feel | Settings → Mouse & Keyboard |
| Design a popup before my tool runs | Toolbar → Designer |
| Save my graph | Save project (.patchwright.json) |
| Load a starter graph | Toolbar → Templates |
| See why build failed | Build status + dock log after Build & Run |
Keyboard shortcuts (common)
| Action | macOS | Windows |
|---|---|---|
| Settings | Cmd+, | Ctrl+, |
| Toggle palette | [ |
[ |
| Toggle code panel | ] |
] |
| Delete selected nodes | Delete / Backspace | Delete / Backspace |
| Fit canvas | Shift+1 / Toolbar Fit | Shift+1 / Toolbar Fit |
Full list appears in Settings → Mouse & Keyboard.
Next steps
- Core Concepts — Run wires, data wires, triggers, undo groups
- Tutorial 1: Rename and recolor
- How to set up Extension Host
- How to set up PatchAI